Microfluidics application note
Published on 27 August 2019
Bubbles are a common issue for a lot of microfluidic related applications.
Gas bubbles circulating through a microfluidic setup can damage the biological sample of interest and/or cause experimental errors:
- Bubbles can cause experimental errors with sensors
- Bubbles inside a biological reactor often increase shear stress or induce cytotoxicity
- Bubbles inside a sample can lead to pipetting and sampling errors.
This application note shows how to detect microfluidic bubbles and change pressure accordingly and/or record events, in a very simple manner. It is also possible to trigger complex actions, like valve switching for instance, using the ESI Scheduler.
It is an easy way to stop an experiment if a bubble appears, or to correlate flow rate behavior with bubbles that could appear during an experiment.
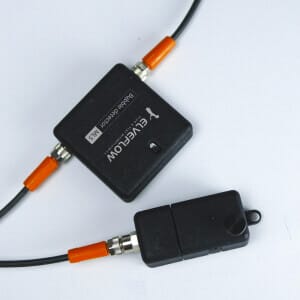
List of components


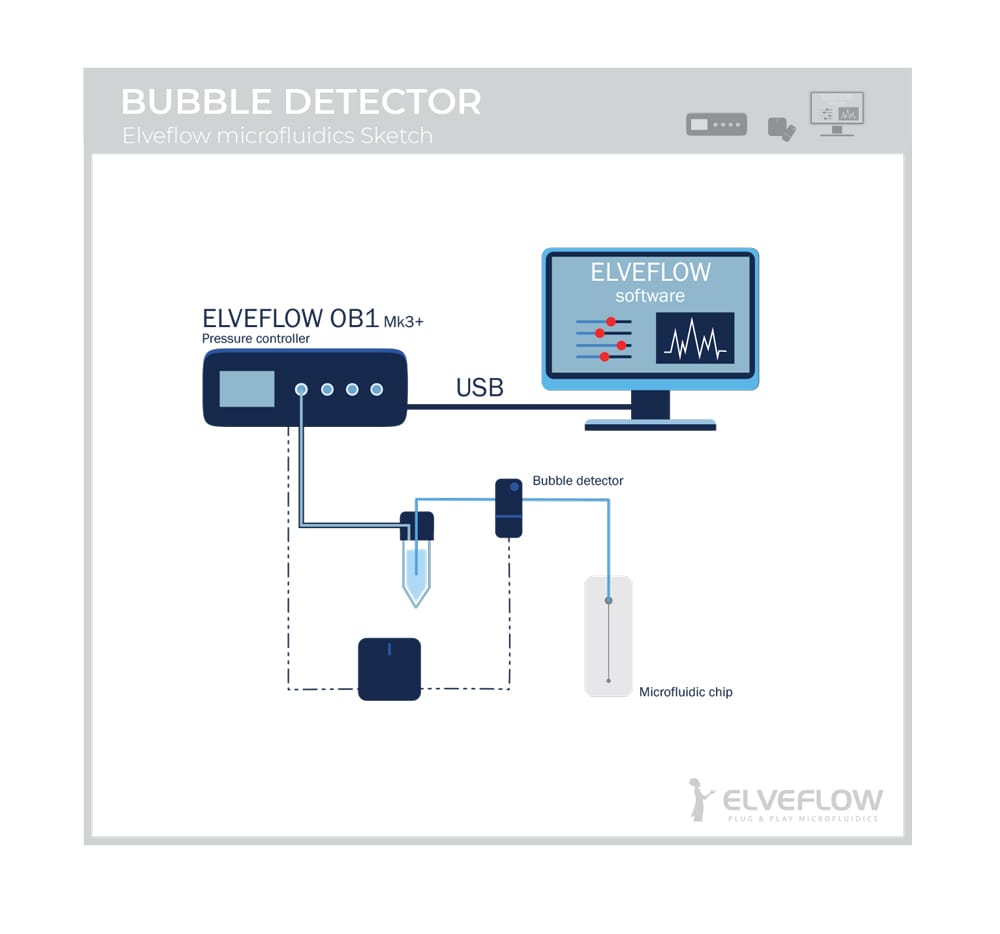
Setup diagram
The following diagram and pictures show the setup used for this application note and where to use the microfluidic bubble detector.
[starter_pack_rebound]
You will find pictures of the fluidic setup in the following gallery:
Bubble detection module
Launch the module “bubble detection”:
- Open Elveflow Software (ESI) and select your OB1 where your the bubble detector is connected.
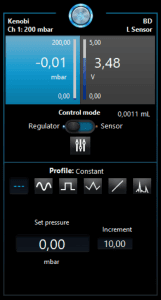
- When you open the module you should see the following front page (IMG. 01).
System priming:
In the first box you can select the voltage at which your solution is flowing, without air interface. This voltage “matches” liquid detection. The standard deviation is the upper and lower values where you are confident that your voltage corresponds to liquid detection.
When the screenshot (picture on the right) is taken, the tubing was filled up with liquid. We observe that the voltage value is 3.48 V. When flushing with air and liquid this value may vary a bit. So we will consider that the value may vary by a factor of 10 %, so the value may vary from 3.48-0.1*3.48≈3.13 and 3.48+0.1*3.48≈3.83. It will determine the range that we consider to be only liquid. When there is only air, the value is close to 0 V.

IMG. 01
IMG. 02
- For instance, we can set these parameters:
- Modify module parameters, choose a file to save data and start the process:
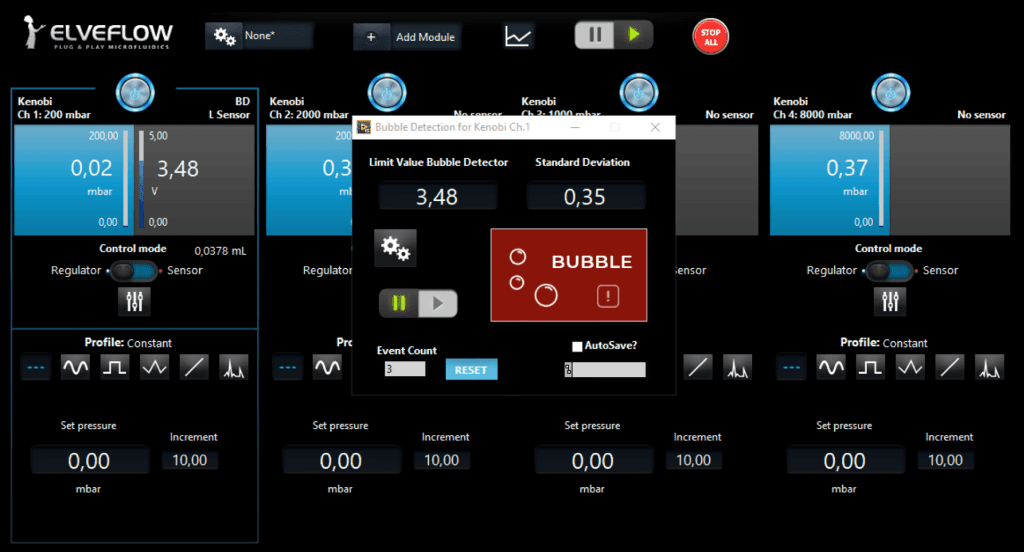
- Now we can modify module parameters. When clicking on the gearing you should obtain this window (IMG. 03).
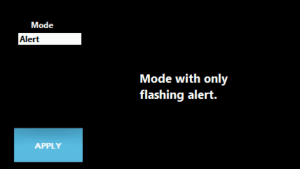
This window indicates that the current mode is the alert mode. In the main window of the module you can observe both an image with the indication “Bubble” and an “event count” box. The alert mode is only used to record events and observe visual changes when bubble events occur.
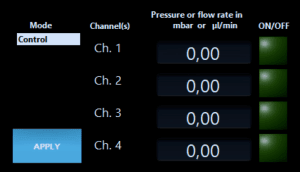
A second mode is available: the control mode. Please find below the corresponding window (IMG. 04).
With this mode, you can modify pressure or flow rate (depending on your channel mode) of one or multiple channels when a bubble event occurs. In the first box, enter the pressure or flow rate value you would like to set when a bubble appears and then select which channel you would like to use by clicking on the ON/OFF button. When the button is OFF, no change will apply, when it is ON the change will be taken into account.
IMG. 03
IMG. 04
- To save the number of events that occurred during your experiment you can tick the “Autosave?” box and choose a text file to save results.
- You can also reset the number of events at any time.
- Finally, click on the play button to start the process. The image showing “Bubble” should be replaced by a “Liquid” image if you have no bubbles.
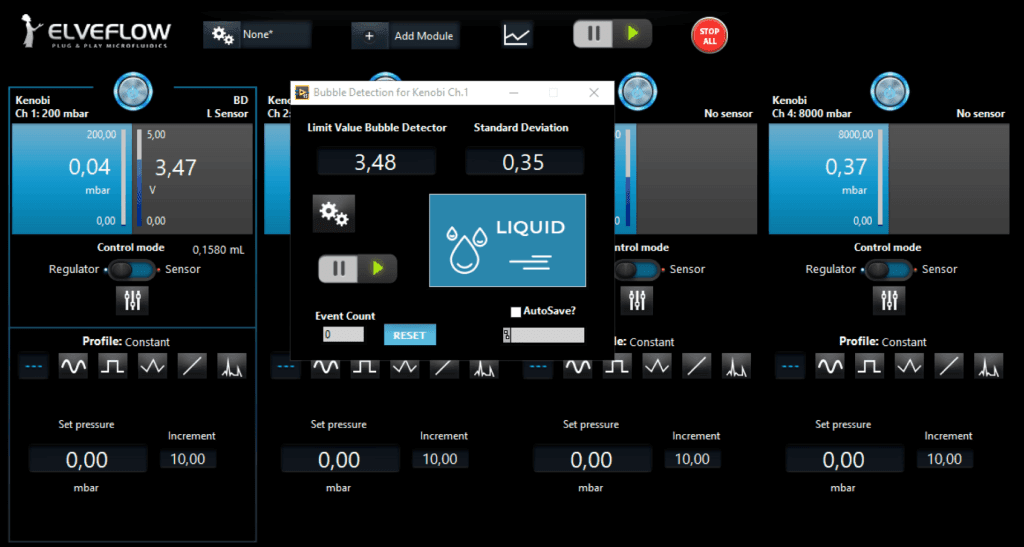
Each time a bubble event is recorded, the “Event Count” increases by one; if you selected a file to save data the time of the event will be recorded. Depending on the mode you choose, the action determined in the parameters will apply when the first event occurs, and every time a new event occurs.

Microfluidic Bubble detector module with ESI software interface
Conclusion
Bubbles are a big challenge for the experimentalists using microfluidics.
The microfluidic bubble detector records bubbles apparition and correlates your data of interest with these events. It also allows you to trigger a simple action when the bubble is detected.
If a more complex action is needed, like for instance valve switching to direct the bubble to a different pathway, it can be done using the Elveflow scheduler.

Microfluidics knowledge
Do you want tips on how to best set up your microfluidic experiment? Do you need inspiration or a different angle to take on your specific problem? Well, we probably have an application note just for you, feel free to check them out!

 Job
Job Collaborations
 Customer
 Other
Other