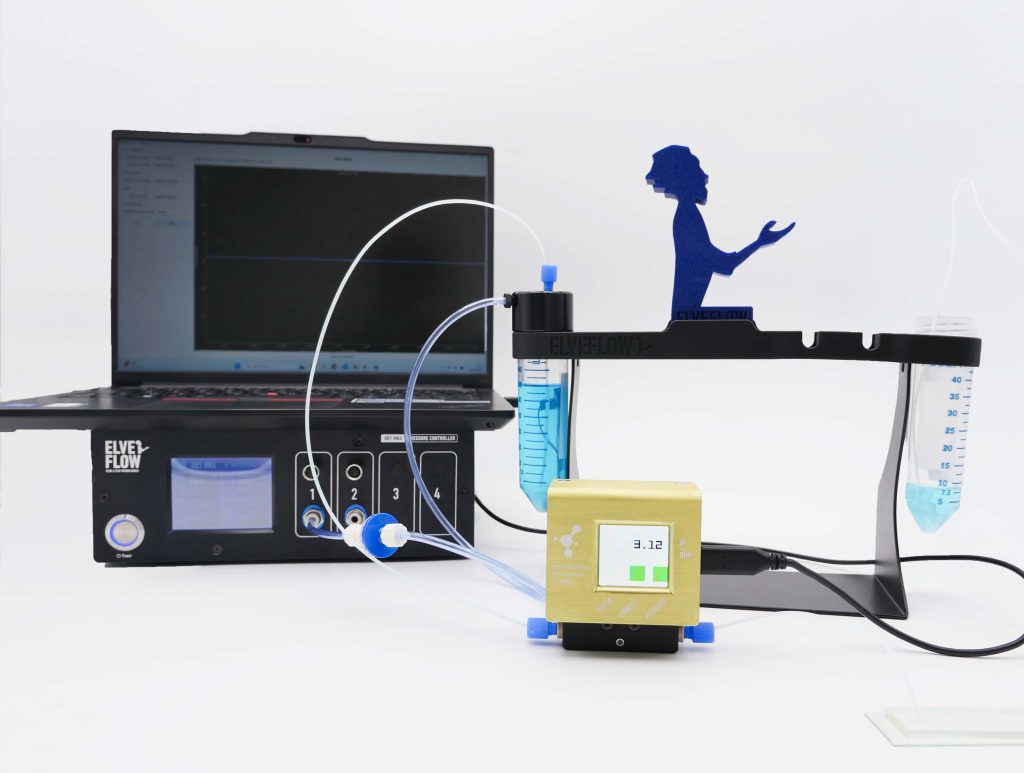
Flow Sensor for Cell Culture Perfusion
Know the flow your cells received, and reproduce the run.Readings repeatable to 0.25% of the value.
An alert on cell debris, matrix or pinched tubing.
When the reading drifts, or between two solutions.
Rated for a CO2 incubator, with no line running out.
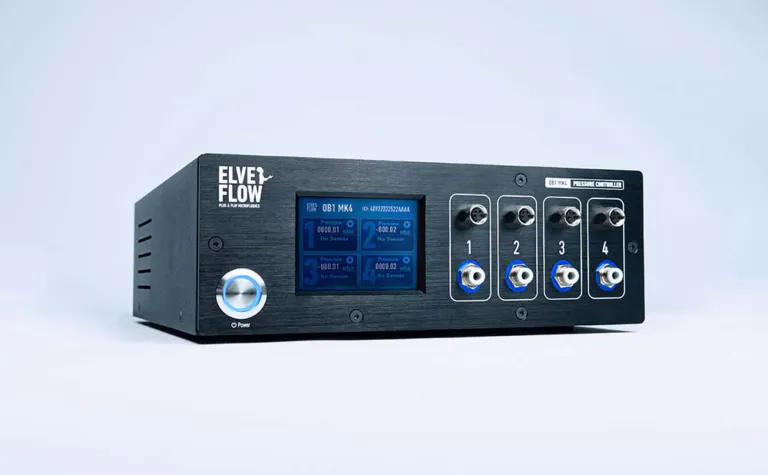
The flow your cell culture receives is read in line, from 1 µL/min to 1 mL/min, and our pressure controller can hold it steady through the run.
Features & Benefits
How a perfusion flow rate gets checked today
You set a pressure on the controller driving your perfusion, then trust that the cells get the flow you planned. In most setups nothing between the controller and the chip measures what gets through. Over a culture that runs for days, the flow you planned and the flow the cells get drift apart. Serum protein and cell debris accumulate in the narrowest parts of the chip and make it harder for the medium to pass. Warming to 37 °C works the other way. The medium thins out, and the same pressure moves more of it. And as the reservoir empties during the run, it pushes a little less. The controller goes on showing the pressure you entered, with no sign that the shear stress on your monolayer has shifted.
Without a flow measurement, you also have no record of the shear stress or the medium renewal your cells had. Neither you nor another lab can then repeat the run as it was. Several methods can check a perfusion flow, and they differ in what they measure and when.
No measurement at all. You take the setpoint on your pump as the record of what the culture received. It costs nothing, and it is right for as long as nothing in the line changes. Once the chip starts to clog or the medium warms, the flow reaching your cells no longer matches that setpoint. Nothing in the run warns you, so you usually find out from the cells themselves. A monolayer detaches or a barrier starts to leak, or an organoid matures more slowly than the last batch did.
A balance under the outlet. If you want the true flow rate, you can collect what comes out of the chip over a set time and weigh it. A balance traces back to a mass standard, which makes this the method sensors are calibrated against. But you only get the answer at the end of the collection, from the far end of the line, so nothing tells you what happens while the cells are under flow. With an open vessel, part of what you collect can also evaporate before it is weighed.
Thermal sensing. A thermal sensor heats a small element in the line and reads the flow continuously from how fast the passing medium carries that heat away. But the element is in direct contact with the medium, so over a long culture it collects a layer of serum protein and cells. This layer changes how the heat leaves the element, and the reading can drift without the display showing it. You then have to plan regular cleaning, even in a run you meant to automate.
Optical sensing, outside the fluid. An optical sensor reads the flow through the tubing wall, so it never touches the medium and raises no sterility concern. Groups building microphysiological platforms have picked it for long cultures, where a sensor in contact with the medium would foul. In return, it needs a clear view through a set length of tubing, and its calibration depends on that tubing as much as on the medium.
Differential pressure, with the flow path in a cartridge. Here the sensor reads the flow from the pressure difference across a known resistance inside a cartridge, without putting any heat into the medium. A pressure-driven line needs such a resistance, usually a length of narrow tubing, to work in a low flow range. The one in the cartridge already plays that role, which leaves you no tubing to size or add. The sensor measures pressure and flow together, so it raises an alert when the line begins to block and flags a reading that drifts. Like a thermal element, this resistance is in contact with the medium and will foul in the end. But it is built into a cartridge that you snap out and replace when the sensor signals that it is time.
The shear your cells were under, recorded hour by hour
The shear stress on your monolayer depends on the flow rate, but few perfusion setups keep track of that rate during the culture. With the sensor in the line, it is measured throughout the run, so you know the shear your cells were under at any point. Those values can go into your paper, and another lab can reproduce the same conditions on its own cells and chip.
A blockage caught before the culture pays for it
A partial blockage forms slowly in the chip or the tubing and can cost a perfused culture days of work, while the pump keeps running as if nothing had changed. Fresh medium reaches the cells more slowly, so they get less nutrient and oxygen, waste accumulates and the shear stress drops. A monolayer can detach or lose its barrier, and an organoid can change phenotype, while the pump display still looks normal. Measuring flow and pressure together, the sensor detects the blockage as soon as it starts and raises an alert.
A culture comparable from its first day to its last
Any sensor that stays in a biological medium fouls over time, and its reading can drift without any sign on the display. Your data then show a steady flow while the real flow was changing, and measurements from the start and the end of the culture are no longer comparable. Here the part that fouls is the cartridge. When the sensor flags a drifting reading, you snap the cartridge out and replace it without tools, while the culture keeps running.
Nothing to size before a fragile model goes under flow
Working in a low flow range with a pressure source usually means adding narrow tubing to the line and recalculating its length and diameter for every new flow rate. The resistance in the cartridge already plays that role, so you connect the reservoir, the sensor and your chip, and start the culture. The line is simpler to set up as a result, with fewer surfaces touching the medium and fewer places for bubbles to get trapped.
Will the shear you designed hold without a loop to tune?
Holding a flow rate steady usually means setting up a feedback loop and finding the right parameters on a live culture. A dedicated algorithm written for this sensor runs that loop with our OB1 pressure controller and needs no tuning. You enter a flow rate, and the controller adjusts the pressure to hold it, even as the chip clogs or the medium warms. The shear stress on your cells stays at the value you planned.
Application
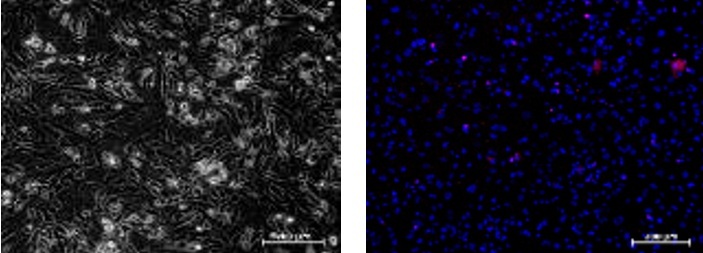
Brain endothelial culture, five days under flow control
We perfused human brain endothelial cells for five days in DMEM supplemented with 5% FBS. The flow was held at 1 µL/min throughout. At the end of day five, phase contrast shows a dense layer of elongated cells. Hoechst stains all nuclei in blue, and propidium iodide stains the nuclei of cells with a damaged membrane in red.
Multi-day organ-on-chip perfusion
For a barrier or vascular model perfused over several days, the sensor is connected in line with the chip and records the delivered flow rate for the whole run. You end up with the shear stress the endothelium received throughout the culture, ready to report to reviewers.
Medium recirculation over a long culture
A unidirectional recirculation loop runs the same medium through the chip for days or weeks so the cells can condition it. Over that time the pump tubing wears and the flow can drift. Placed next to the chip, the sensor measures the renewal rate the cells get and flags a blockage as it forms.
Dose and washout timing in drug work
On a chip, drug exposure depends on how fast the solution arrives and how fast it is washed out. With a continuous flow reading you can time both, and your dose-response curve rests on a measured exposure time that stays comparable across chips and cell batches.
Exposure protocols in toxicity testing
Chronic and repeated-dose protocols define exposure as a concentration multiplied by a time, and that time is usually assumed. Measuring the delivered flow over the whole exposure gives it to you as data, an advantage for slow endpoints such as a loss of viability or a shift in phenotype.
Organoid perfusion and vascularised models
Organoids matured under continuous medium renewal need a flow low enough to spare their surface cells and steady enough to keep their core oxygenated. They give little sign when that flow drifts. The sensor measures the rate throughout maturation and raises an alert if the line starts to block. We help you choose the cartridge that matches your protocol’s rate.
| Galileo | ||
|---|---|---|
| Measuring ranges and cartridges | ||
| Measuring range | 1 µL/min to 1 mL/min, over two cartridges | |
| Cartridge ranges | 1 to 40 µL/min, and 25 µL/min to 1 mL/min | |
| Other ranges on request | ||
| Snap-in cartridge carrying the flow path, exchanged without tools | ||
| Internal volume | 12 µL on the 1 to 40 µL/min cartridge, 15 µL on the 25 µL/min to 1 mL/min cartridge | |
| Wetted materials | PEEK, PFPE, ETFE, FSIL, stainless steel | |
| Fluidic connections | ¼”-28 female UNF | |
| Measurement | ||
| Accuracy | 2% of the measured value | |
| Precision | below 0.01% of full scale | |
| Repeatability | below 0.25% of the measured value | |
| Response time | τ95 below 20 ms to a pressure step | |
| Data rate | 200 Hz | |
| Flow direction | bi-directional, positive and negative | |
| Pressure measurement range | 0–3 bar absolute | |
| Temperature correction factor | below 0.05% of the measured value per °C | |
| Alerts and display | ||
| Clogging alert on the instrument | ||
| LCD screen on the instrument, for live flow-rate reading | ||
| Operating conditions | ||
| Operating temperature | 10–40 °C | |
| Operating absolute pressure | 0–4 bar | |
| Warm-up | over 15 min for optimal performance | |
| CO2 incubator compatibility | yes | |
| Control and power | ||
| 5 V DC supply, USB-C | ||
| UART interface for integration into another instrument | ||
| Physical | ||
| Base | 150 g, 70 × 65 × 35 mm | |
| Cartridge | 40 g, 60 × 49 × 17 mm | |
Specifications are given for pure water at 25 °C. The internal resistance scales with viscosity, so the measuring range shifts for a culture medium and shifts again as that medium warms to 37 °C. The response time is the time to reach 95% of a new value after a pressure step. The temperature correction is relative to the 25 °C calibration.
Funding & Acknowledgment
The development of this microfluidic flow sensor has received funding from the European Union’s Horizon research and innovation program under HORIZON-EIC-2022-TRANSITION-01, grant agreement no. 101113098 (GALILEO).



Frequently Asked Questions
The Galileo flow sensor is connected into your perfusion line, between whatever pushes the liquid and the chip or chamber holding your cells, and measures the flow rate there. Its snap-in cartridge contains a known resistance, and the sensor calculates the flow rate from the pressure difference across it. The sensor also raises an alert when the line starts to block. The Galileo was developed by the Microfluidics Innovation Center and is supplied by Elveflow.
Yes, you can. The Galileo flow sensor is rated for a CO2 incubator and for ambient temperatures from 10 to 40 °C, so you can place it right beside the chip. You read the live flow rate on its LCD screen, and the short tubing to the cells means the medium is not cooled and warmed again on its way. Its reading is corrected for temperature, with a factor below 0.05% of the measured value per degree, and it needs a warm-up of over 15 minutes for optimal performance.
The Galileo flow sensor comes calibrated for water. To calibrate it for your liquid, you only need to enter that liquid’s viscosity at a given temperature. The parts of the sensor in contact with your liquid are PEEK, PFPE, ETFE, FSIL and stainless steel, so you can check your medium, serum and reagents against that list. Send us the liquid and the rate you use, and we will confirm which cartridge range fits.
When the line starts to block, it needs more pressure for the same flow. The Galileo flow sensor raises its alert on that rise, with no threshold for you to set. To find the blockage, check the chip first, where the channels are narrowest and cell debris and matrix collect, then the connectors and the tubing. You can also swap the cartridge, which takes two seconds. If the alert clears, the blockage was in the cartridge, and if it does not, it is in your device.
Carry-over stays small, because the Galileo flow sensor’s cartridge holds only 12 µL or 15 µL, depending on the cartridge, and you replace it between experiments. When two solutions must never meet, use a fresh cartridge. Otherwise, rinse the flow path in place, choosing a solution that suits its wetted materials. A distribution valve upstream, such as our MUX Distribution, can switch to the rinse without disconnecting anything, and it can be plumbed in several ways. Tell us how your protocol handles the flow path between cultures, and we will confirm the setup with you.
The Galileo flow sensor spares you two steps. A pressure-driven line usually needs narrow tubing to work in a low flow range, sized again for every new target, and the resistance in the cartridge already plays that role. Holding the rate steady also normally means tuning feedback parameters on a live culture, which a dedicated algorithm written for this sensor does for you. You enter a rate, and our OB1 pressure controller adjusts the pressure to hold it, even as the chip clogs or the medium warms.
A bubble disturbs the Galileo flow sensor’s reading while it passes, as air does not flow through the resistance in the cartridge the way the medium does. You see it as a brief blip in the trace, and that shape is worth learning to recognise. On a long culture, our bubble remover takes the air out upstream of the sensor. That protects your cells as much as the reading, since one bubble crossing a monolayer can strip cells in seconds.
You can, up to 3 bar absolute, since the Galileo flow sensor measures pressure to calculate the flow rate and makes that pressure available as a separate reading. A slow rise at constant flow usually means protein or cell debris accumulating at the chip, and a sudden drop points to a disconnection or a leak. The flow is measured in both directions, so backflow into the chip shows up as a negative flow rate. With both readings, you can tell a clogging chip from a pump that has stopped delivering.
You can use it for both. Placed after your syringe pump or peristaltic pump, the Galileo flow sensor measures the rate that reaches the chip, so you can check what a 50 µL/min setting delivers. In series with a flow sensor you already own, it gives you a second reading to compare. This helps when you qualify a colleague’s setup or take over a protocol with a flow rate written into it.
The Galileo flow sensor runs on 5 V DC over USB-C and has a UART interface for integration into another instrument. Both parts are compact enough to fit inside a housing, the base at 70 × 65 × 35 mm and the cartridge at 60 × 49 × 17 mm. Beyond that, each integration depends on the instrument it goes into, and we work through those cases one at a time.
Contact us through the form and tell us the flow rate your protocol runs at. We will propose the cartridge range that fits and the accessories your line needs, along with our pressure controller to hold that rate while the Galileo flow sensor reads it.



 Job
 Collaborations
 Customer
 Other